레이 아웃이 직선 형태로 만들어 지는 것을 linear layout이라고 합니다.
activity_main.xml
<LinearLayout xmlns:android="http://schemas.android.com/apk/res/android"
    xmlns:tools="http://schemas.android.com/tools"
    android:layout_width="fill_parent"
    android:layout_height="fill_parent"
    android:orientation="vertical"
    tools:context=".MainActivity">

    <LinearLayout
        android:orientation="horizontal"
        android:layout_width="fill_parent"
        android:layout_height="fill_parent"
        android:layout_weight="1">

    <TextView
        android:text="Red"
        android:layout_width="wrap_content"
        android:layout_height="fill_parent"
        android:background="#ff0000"
        android:gravity="center_horizontal"/>

    <TextView
        android:text="Green"
        android:gravity="center_horizontal"
        android:background="#00ff00"
        android:layout_width="wrap_content"
        android:layout_height="fill_parent"/>

    <TextView
        android:text="Blue"
        android:gravity="center_horizontal"
        android:background="#0000ff"
        android:layout_width="wrap_content"
        android:layout_height="fill_parent"/>

    <TextView
        android:text="Yellow!!!!!"
        android:gravity="center_horizontal"
        android:background="#ffff00"
        android:layout_width="wrap_content"
        android:layout_height="fill_parent"/>
    </LinearLayout>

    <LinearLayout
        android:orientation="vertical"
        android:layout_width="fill_parent"
        android:layout_height="fill_parent"
        android:layout_weight="2">

        <TextView
            android:text="Row one"
            android:textSize="12pt"
            android:layout_width="fill_parent"
            android:layout_height="wrap_content"
            android:layout_weight="1"/>
        <TextView
            android:text="Row two"
            android:textSize="12pt"
            android:layout_width="fill_parent"
            android:layout_height="wrap_content"
            android:layout_weight="1"/>
     <TextView
            android:text="Row three"
            android:textSize="12pt"
            android:layout_width="fill_parent"
            android:layout_height="wrap_content"
            android:layout_weight="1"/>
     <TextView
            android:text="Row four"
            android:textSize="12pt"
            android:layout_width="fill_parent"
            android:layout_height="wrap_content"
            android:layout_weight="1"/>
 </LinearLayout>
</LinearLayout>
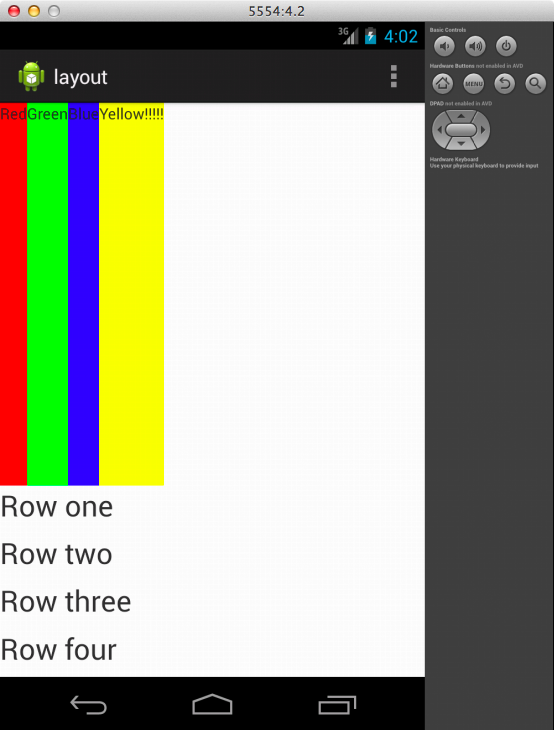
수행결과는 아래와 같음.
레이아웃을 라인으로 처리하는 것을 알 수 있습니다.
이번에는 frame layout 을 살펴보도록 하겠습니다.
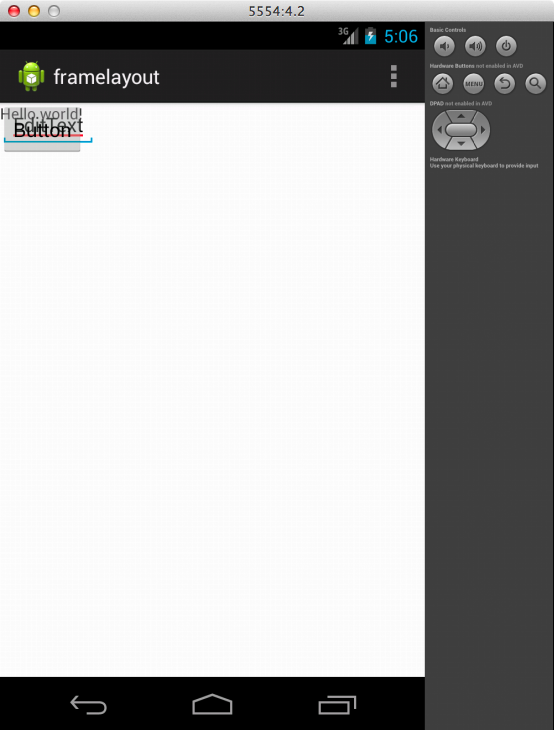
frame layout은 왼쪽 상단을 기준으로 포개는 것을 말함.
activity_main.xml
<?xml version ="1.0" encoding="utf-8"?>

<FrameLayout
    android:layout_width="fill_parent"
    android:layout_height="fill_parent"
    xmlns:android="http://schemas.android.com/apk/res/android">
    <TextView
        android:layout_width="fill_parent"
        android:layout_height="wrap_content"
        android:text="@string/hello_world"/>
    <EditText
        android:text="EditText"
        android:id="@+id/EditText01"
        android:layout_width="wrap_content"
        android:layout_height="wrap_content"/>
    <Button
        android:text="Button"
        android:id="@+id/Button01"
        android:layout_width="wrap_content"
        android:layout_height="wrap_content"/>
</FrameLayout>
실행 결과는 다음과 같음.
이번에는 relative layout을 알아보도록 하겠습니다.
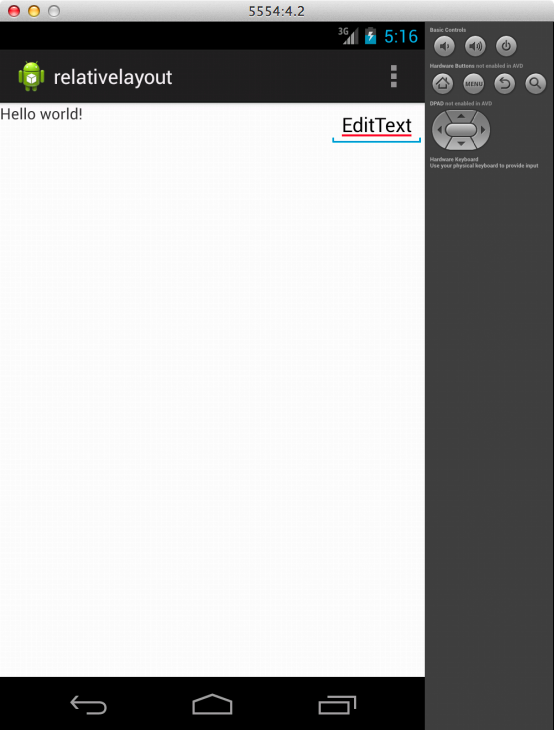
relative rayout은 상대적으로 위치를 하게 만드는 레이아웃입니다.
activity_main.xml
<RelativeLayout xmlns:android="http://schemas.android.com/apk/res/android"
    android:layout_width="fill_parent"
    android:layout_height="fill_parent">

    <TextView
        android:layout_width="wrap_content"
        android:layout_height="wrap_content"
        android:text="@string/hello_world" />
 <EditText
     android:text="EditText"
     android:id="@+id/EditText01"
     android:layout_width="wrap_content"
     android:layout_height="wrap_content"
     android:layout_alignParentRight="true"/>

</RelativeLayout>
실행결과는 다음과 같습니다.
이번에는 table layout입니다.
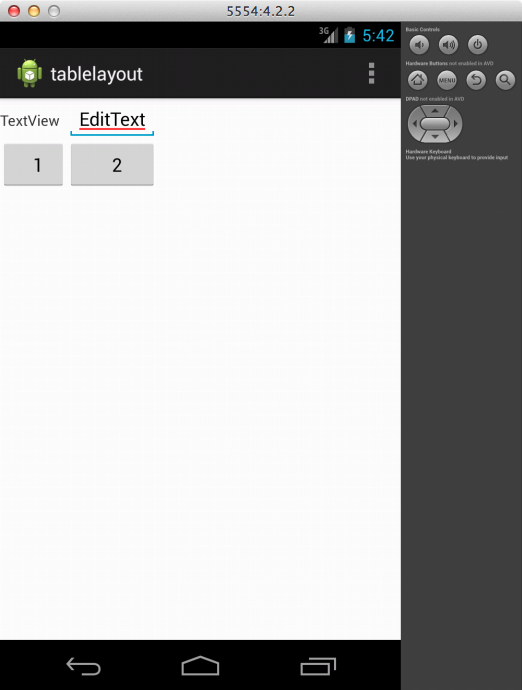
테이블 레이아웃은 테이블 형태로 배치하는 레이아웃을 말한다.
activity_main.xml
<TableLayout xmlns:android="http://schemas.android.com/apk/res/android"
    android:layout_width="fill_parent"
    android:layout_height="fill_parent">

    <TableRow
        android:layout_width="fill_parent"
        android:layout_height="wrap_content">

        <TextView
            android:layout_width="wrap_content"
            android:layout_height="wrap_content"
            android:text="TextView"/>

        <EditText
            android:text="EditText"
            android:id="@+id/EditText01"
            android:layout_width="wrap_content"
            android:layout_height="wrap_content"/>
        </TableRow>
        <TableRow
            android:layout_width="fill_parent"
            android:layout_height="wrap_content">
        <Button
            android:text="버튼1"
            android:id="@+id/Button01"
            android:layout_width="wrap_content"
            android:layout_height="wrap_content"/>

        <Button
            android:text="버튼2"
            android:id="@+id/Button02"
            android:layout_width="wrap_content"
            android:layout_height="wrap_content"/>
        </TableRow>

        </TableLayout>
실행 결과
tab layout
실행 실패. 다시 코딩해서 올리겠습니다.
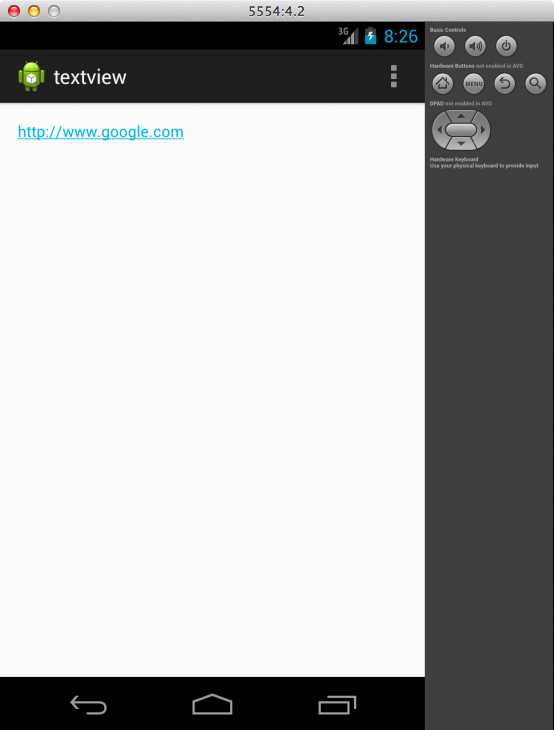
textview를 동적으로 변경하는 방법입니다. 레이아웃에서는 id를 지정해 주고 java코드 쪽에서 수정해 줍니다.
activity_main.xml
<RelativeLayout xmlns:android="http://schemas.android.com/apk/res/android"
    xmlns:tools="http://schemas.android.com/tools"
    android:layout_width="match_parent"
    android:layout_height="match_parent"
    android:paddingBottom="@dimen/activity_vertical_margin"
    android:paddingLeft="@dimen/activity_horizontal_margin"
    android:paddingRight="@dimen/activity_horizontal_margin"
    android:paddingTop="@dimen/activity_vertical_margin"
    tools:context=".MainActivity" >

    <TextView
        android:layout_width="wrap_content"
        android:layout_height="wrap_content"
        android:id="@+id/text"/>

</RelativeLayout>
TextView 쪽에서 동적으로 제어 합니다.
MainActivity.java
package com.exam6;

import android.os.Bundle;
import android.app.Activity;
import android.text.util.Linkify;
import android.view.Menu;
import android.widget.TextView;

public class MainActivity extends Activity {

 @Override
 protected void onCreate(Bundle savedInstanceState) {
  super.onCreate(savedInstanceState);
  setContentView(R.layout.activity_main);

  TextView tv = (TextView) findViewById(R.id.text);
  tv.setText("http://www.google.com");
  Linkify.addLinks(tv, Linkify.ALL);
 }

 @Override
 public boolean onCreateOptionsMenu(Menu menu) {
  // Inflate the menu; this adds items to the action bar if it is present.
  getMenuInflater().inflate(R.menu.main, menu);
  return true;
 }

}
실행결과
edittext
editText를 동적으로 제어하는 방법입니다. 마찬가지로 id를 설정해주고 java 쪽 코드에서 변경해주는 방법.
activity_main.xml
<RelativeLayout xmlns:android="http://schemas.android.com/apk/res/android"
    xmlns:tools="http://schemas.android.com/tools"
    android:layout_width="match_parent"
    android:layout_height="match_parent"
    android:paddingBottom="@dimen/activity_vertical_margin"
    android:paddingLeft="@dimen/activity_horizontal_margin"
    android:paddingRight="@dimen/activity_horizontal_margin"
    android:paddingTop="@dimen/activity_vertical_margin"
    tools:context=".MainActivity" >

    <EditText
        android:id="@+id/text"
        android:text="@+id/text"
        android:layout_width="wrap_content"
        android:layout_height="wrap_content"/>

</RelativeLayout>
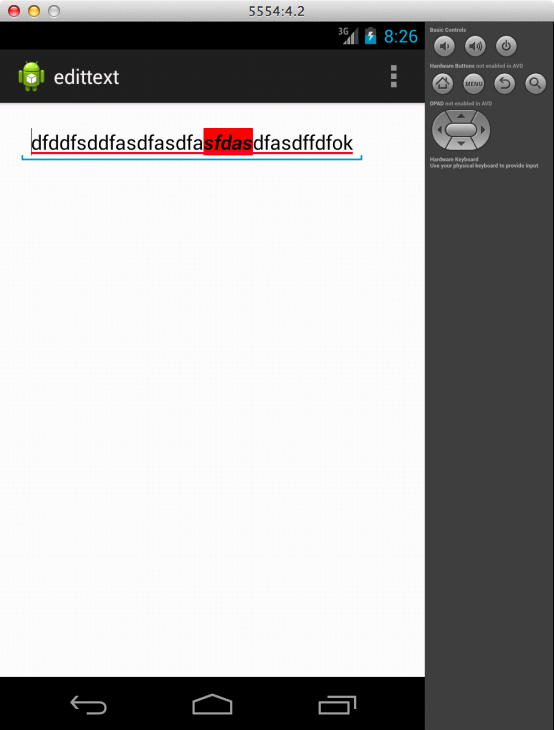
EditText 부터
MainActivity.java
package com.exam7;

import android.os.Bundle;
import android.app.Activity;
import android.graphics.Color;
import android.text.Spannable;
import android.text.style.BackgroundColorSpan;
import android.text.style.StyleSpan;
import android.view.Menu;
import android.view.View;
import android.widget.EditText;

public class MainActivity extends Activity {

 @Override
 protected void onCreate(Bundle savedInstanceState) {
  super.onCreate(savedInstanceState);
  setContentView(R.layout.activity_main);

  EditText et = (EditText) findViewById(R.id.text);
  et.setText("dfddfsddfasdfasdfasfdasdfasdffdfok");

  Spannable spn = et.getText();

  spn.setSpan(new BackgroundColorSpan(Color.RED), 18, 23, Spannable.SPAN_EXCLUSIVE_EXCLUSIVE);
  spn.setSpan(new StyleSpan(android.graphics.Typeface.BOLD_ITALIC), 18, 23, Spannable.SPAN_EXCLUSIVE_EXCLUSIVE);

 }

 @Override
 public boolean onCreateOptionsMenu(Menu menu) {
  // Inflate the menu; this adds items to the action bar if it is present.
  getMenuInflater().inflate(R.menu.main, menu);
  return true;
 }

}
실행 결과